Process to build
Taking the Stress out of home building

PRE-CONSTRUCTION
Several pre-construction meetings with the architect, homeowner, and Aspen Custom Homes are needed to discuss and finalize the new home plans. An engineer needs to approve any changes to a plan after the architect has made his final recommendations. This can add several weeks to the process but will assure that your home will be structurally sound when complete. Aspen Custom Homes will then promptly obtain permits, prepare the site, and get everything organized to ensure the most efficient construction process. Construction can usually begin relatively quickly, but know that utility availability, construction crew backups, delay in the developer’s delivery of lots, availability of materials and subcontractors, changes requested by the homebuyer and the degree of difficulty encountered in initiating those changes plus the time for independent inspections. The most frequent cause of delay is usually weather, specifically rain.

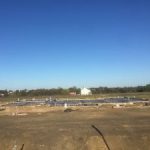
HOME SITE PREPARATION
- Soil testing is done so an engineer can design the proper foundation for your house.
- Permits and approvals are secured from the local building authority.
- Aspen Custom Homes works with you to determine where your home will sit on the home site.
- Your home’s position and orientation (“garage right” or “garage left”) is determined by such factors as terrain, drainage, utility easements, and municipal requirements for setback and side yards. Your home site is surveyed and marked to show final positioning.
- The land is cleared of obstructions. Existing trees may be removed from the home site as necessary.
- Excavation as needed to prepare the home site for the foundation.
FOUNDATION
- The slab is prepared and beams are cut per the engineer’s design specifications.
- Cables and rebar are installed.
- Plumbing and electrical underground rough-in occur.
- The foundation stage has several critical inspections. Each inspection must be approved by the local municipality before we can move on to the next stage and this ensures that your home is built to last.
- House slab is poured.
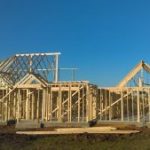
FRAMING
After the foundation is in place, the structure is ready to be framed, a process that normally takes two to three weeks. During this phase:
- The framing for each floor plan is individually engineered to meet structural and wind requirements.
- Wood studs, beams, floor joists and/or floor trusses, and rafters are used to create the skeletal structure of the home.
- The exterior walls, interior walls, and roof are erected.
- Framing is inspected per local requirements.
- Buyer Framing Walk-Through.
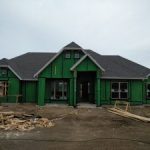
EXTERIOR TRIM
This is sometimes referred to as the roof stage. Once it’s completed, the house is considered “weather proof.” In this stage:
- Exterior sheathing and siding is added.
- Windows, doors and exterior garage doors are installed.
- The eaves, fascia, and overhang are built.
- Brick and stone are installed.
- Covered deck and stairs are installed.
- Roof decking and shingles are put into place.

ROUGH-IN AND INSULATION
- Plumbing waste, vent, and supply lines are installed.
- All wiring and cables are installed.
- HVAC (heating, ventilating, and air conditioning) equipment and ducts are installed.
- Once the mechanical systems are installed and inspected, insulation is placed in the exterior walls.
- Mechanical systems are inspected per local requirements.
- Buyer Electrical Walk-Through.
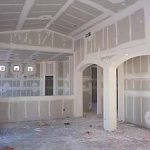
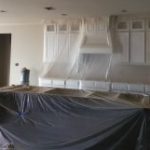
SHEETROCK
This is where you really get a feel for all the rooms and layout of your house. In this stage:
- The sheetrock, also called drywall, is installed.
- It is then taped and floated to cover fastener holes and seams.
- Texture is applied to the walls and ceilings.

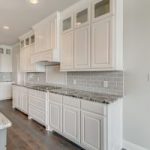
INTERIOR TRIM
- Interior doors are hung.
- Casing, molding, and baseboards are installed.
- Custom closet shelving is built and installed.
- Custom cabinets are built and installed.
- Buyer Trim Walk-Through.
PAINTING
Painting really brings color and personality to your home. During this stage:
- Interior painting, caulking, and staining begin.
- Exterior painting is applied.
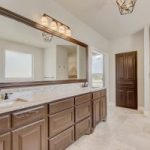
FLOORING AND COUNTERTOPS
- Tile and engineered wood flooring are all installed.
- Granite, marble, quartz, or butcher block countertops are installed.
- Tile is installed to bathrooms, utility rooms, and backsplashes.

MECHANICAL DETAILS
- Plumbing fixtures are installed.
- Electrical fixtures are installed.
- The HVAC compressor and thermostat are installed.
- The HVAC components are matched for maximum efficiency.
- The alarm keypads and control panel are mounted (if applicable).
- All grilles, switch plates, receptacles, and light fixtures are installed.
FINAL FINISHES
- Mirrors are hung.
- All final paint and stain is touched up.
- Any remaining floor moldings are installed and painted.
- Appliances are installed
- Carpet is installed.
- Shower doors are installed
- Final Buyer Walk-Through
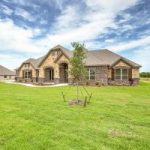
FINAL GRADE AND LANDSCAPING
- Final grade of the site is completed.
- Irrigation is added (if applicable).
- Landscape and sod are installed.
- Your home is again inspected by the local building inspectors.
- Customer Orientation Walk-Through.
Your Aspen Custom Home is now ready for move in!